|
BACK HALF YOUR CAR: Frame TO START Building a rear suspension in a Pro Street or Drag car is not as hard as you might think. Our rear suspension kits make it super easy. It takes some time and some skill, but professional results can be obtained if you carefully follow our instructions. For our demonstration we are using a '63 Pro Steet Nova. Our instructions can be used for virtually any car you are planning to build. THE 4-LINK IS OUR PRO-STREET "ULTIMATE II" #1 Raise car and put on jack stands or frame jig. Make sure it is level. Lay out centerline of car and of rear axle (as shown in instruction pack that is given with each jig-welded frame assembly). 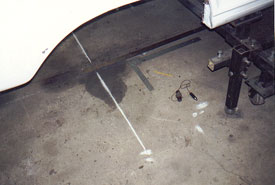 #2 Transfer lines for crossmember to the floor pan ( as per instruction pack). Using a plumb bob, transfer the line on the floor to the bottom of the car and drill 1/8" holes through the floor of the car for reference points. Draw line across the floor being careful to intersect the 1/8" holes. 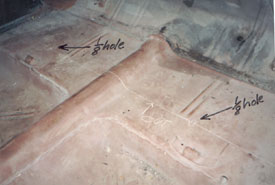 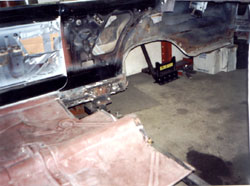 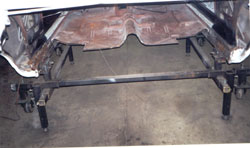 #3 a+b Remove floor, from the line to the back of car. Remove stock wheel tubs, being careful to remove only the tub itself, and no cutting through the outer fender panel (quarter panel). A die grinder with a cut-off wheel works best in the fender lip area. 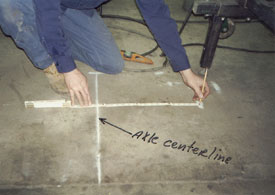 #4 At this time you'll want to plot out where the 4-link bolt hole centerline will be in relation to the axle. On our Pro Street 4-link (Ultimate II) this will be 18 3/4" from the center of axle to center of 4-link holes at the bottom of the front brackets. NOTE: WHEN MARKING ON THE FLOOR SURFACE, YOU MAY WANT TO USE A SOAPSTONE TO WHITEN THE AREA TO BE MARKED, THEN USE A PENCIL TO MARK THE LINE INTENDED, AS ILLUSTRATED ABOVE. 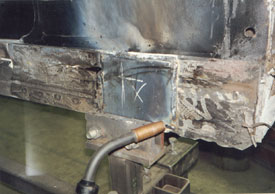 #5 Plot out where crossmember will be and weld plates provided in the kit to the rocker box. 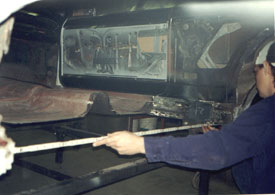 #6 Measure across from plate to plate for total width. 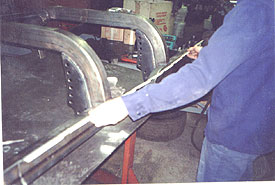 #7 Transfer the same measurement to the jig-welded kit's crossmember and cut to this exact width. 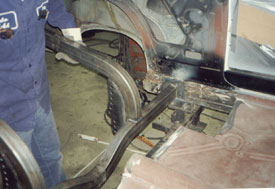 #8 Slide the jig-welded frame into the appropriate area. Clamp a piece of 1x1 angle iron to the rocker box pinch weld. This will aid in holding the front crossmember of the kit. The back of it will need to be supported as well. #9 The top of the frame should be at the specified angle. Approx. 12 degrees on the "Ultimate II" 4-link.  #10 Now using the line you have on the floor, that is, marking the bolt hole in relation to the axle, line up the jig-welded frame, using the 4-link holes for alignment. Then tack weld the crossmember to the plates that were welded to the rocker box earlier. 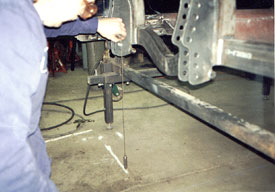 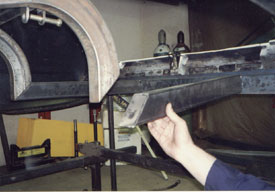 #11 In this kit, the back of the frame rail is not attached. We do this for two reasons. First: It's easier for the builder to get the frame right, because it is easier to fit up two places at one time, instead of four, when installing the frame. Second: It makes more trunk room. This is needed especially on small cars. ALTHOUGH MOST OF OUR KITS ARE MADE WITH A "ONE PIECE" FRAMERAIL, A "TWO PIECE" FRAMERAIL IS AN "OPTION" ,at no extra cost upon request. *** (CLICK HERE) for another example of this process using our "curved rails" on our "FAIRLANE PROJECT" page. #12 Frame stubs installed. 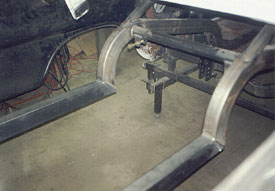 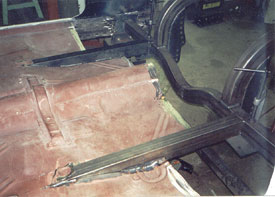 #13 Typical installation of frame connectors. Cut floor sections out 2" wide only where connector protrudes through floor, tack into place. Then weld fully. 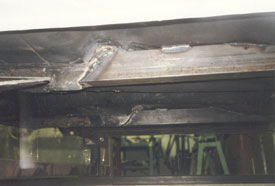 #14 Connector will be welded to the back of the front frame. 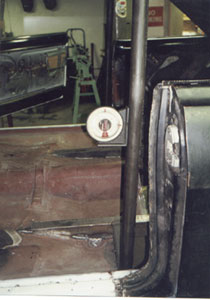 #15 Roll bar hoop is installed at this time. Notice hoop is leaning back about 5 degrees. this is typical. 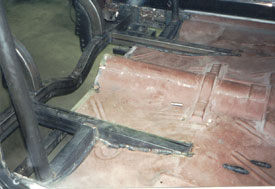 #16 Notice roll bar hoop is located on the "outriggers", one on each side. Installation of outriggers, is similar to that of the crossmember. A 1/8" plate is welded to the rocker box first. Then 2x3 tubing is positioned between the plate and connector and tack welded. NOTE: NOT ALL CARS REQUIRE THIS EXTRA OUTRIGGER. ON SOME, THE ROLL BAR HOOP IS VERY CLOSE TO, IF NOT RIGHT ON TOP, OF THE 2X3 CROSSMEMBER. Next, install the two rear roll bar braces and tack weld in position. Now, fully weld all frame areas, being careful not to pull the frame from the heat, (alternate from side to side when welding). BACK HALF YOUR CAR: Wheel Tubs Putting in wheel tubs is easier than you think. Follow the instructions carefully. 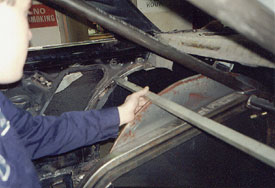 #17 Make a marking tool (as per instruction pack). Now clamp both "half moons"(tub sides) into place where the wheel tubs will be, making sure to keep them square with each other. Now draw line around the sides of the inner panels using the marking tool. Mark both front and back, making sure to mark the trunk hinge area as well. Then cut the marked areas out. Use a die grinder with cut off wheel for a smooth cut. #18 With the half moons still in place, take rough measurements every two (2)inches. Then starting in front at the bottom and ending up at the back of the tub, write each measurement down in a notebook. 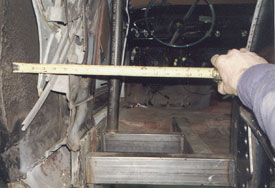 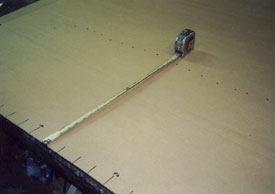 #19 Using a piece of cardboard (shipping box), transfer measurements to the cardboard, and cut out. #20 Position cardboard in wheel tub area (half moons still in place) and tape to the half moon. Make sure cardboard is up against the cut-out area for a good fit. This will be your template.(Repeat for both sides) 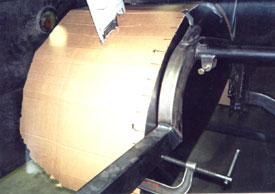  #21 Make a template of the front and rear corners, where wheel tub touches the outer rocker panel area and the quarter panel area, and make reference marks to locate template when transferring to the metal counter part.  #22 Using this simple tool made from a piece of sheet metal, and a marker, make a tranfer marking device. Draw around the tub area where the tub touches the quarter panel.This will be your transfer line.   #23 Now remove the cardboard from car and place on the metal wheel tub flat. Now in reverse fashion (using the transfer tool) draw along the previously established line. The end result will be a direct copy of the inside of the quarter panel.  #24 Cut out along the lines. #25 Before removing the half moons from the car, trace where the bottom of the frame is in relation to the half moon.   #26 Add 1-1/2" to the line drawn on the half moon and cut out. This will place the weld area in the middle of the 2x3 frame rail. #27 Our steel tubs are easier to assemble than any on the market (cleaner looking too!) Just use a body hammer and gently tap the two sections together. It's a snap!    #28 a&b To put the tub in place, start by inserting front portion of tub in place first, then progressively push, lift and twist tub slightly to put into position. A couple of tries and you'll be an expert.  #29 After tub is in place, check to make sure you have at least 1/8" gap between the tub and the quarter panel all the way around. (DO NOT WELD TUB TO QUARTER PANEL)!!!!! Use only silicone sealer to seal gap. The reason is, as the car flexes, it will pull on tacks and you will see every tack weld in the paint job after a time. Silicone sealer is the best way because it also acts as a cushion between the two. This is why you need a slight gap to start. You may have to take the tub in and out a few times to get the desired gap. After the tubs are fitted, remove them and set them to the side, and get ready for sheet metal work. BACK HALF YOUR CAR: Sheet Metal #30 Easy sheet metal closure is designed into every AUTO WELD kit. Cut a length of sheet metal the same width as the frame rails. We usually use two pieces to close the frame rail area. NOTE: AUTO WELD sheet metal kits are available on this web catalog in ALUMINIUM or STEEL! 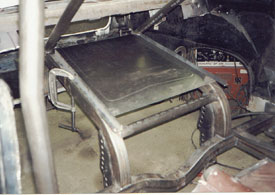 #31 For the cleanest looking floor use this procedure. After cutting sheet metal to the width of the frame rail, roll edge over with a body hammer, then stich weld. Notice good fit around the roll bar tube. 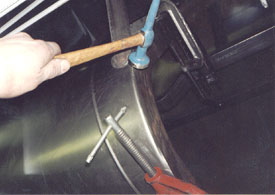 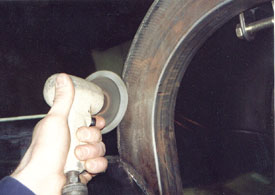 #32 With a sander, polish off the high spots of the weld. #33 The seat brace along with the frame/4-link stiffeners are now installed. The tunnel is started. Keep in mind, the lower you make the car sit, the higher the trans tunnel will have to be. NOTE: This Nova will sit 8" off the ground, so the tunnel is raised for driveshaft clearance. 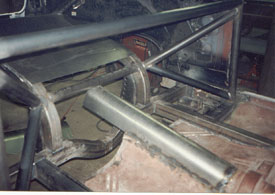  #34 This is the proper way to brace a 4-link car. Notice the welds are as pretty as they are strong!  #35 Cut out sheet metal to cover the open area between the roll bar outrigger and the frame crossmember, making sure you have a lip on it for the tub to go against. #36 Finish closing front and finish tunnel area.  #37 Put wheel tubs into place being careful to position them exactly square and level with each other. The first weld will be at the top of the tub along the roll bar. Stitch weld about 3/4 of an inch as shown.   #38 a&b Tub is in place, ready to be welded. Have a friend push from underneath to close places that do not touch....tack weld.  #39 Some cars you can get away with retaining the trunk hinges. They should be tacked to the tub as shown. NOTE the clean look between the tubs and floor area.  #40 After tubs are tacked to inner panel, weld to frame, using same procedure (little tacks). You don't want to warp the half moons now! Also, tack every few inches along the inside of the tubs as shown. This positively locks the two tub sections together.  #41 Finished (Well, almost). NOTE how tunnel area has been trimmed and cleaned. NICE! 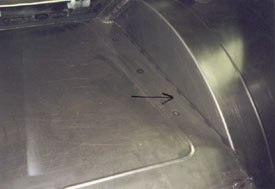 #42 A look at the top side of the floor area. Clean! (No uglies here!) 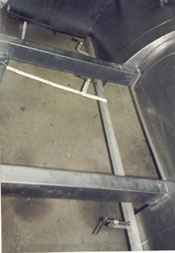 #43 To do the trunk area, use a length of square tubing and clamp to the tubs to square the bottoms. Now measure for sheet metal.  #44 a&b We usually make the floor in one piece if possible. NOTE the lips where the new piece touches the back of the tubs and in the center. (Easier to weld this way). AUTO WELD SHEET METAL KITS HAVE THESE FEATURES BUILT IN. 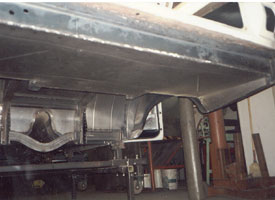 #45 A look from underneath....All edges were rolled over, welded and polished off. Just like the first piece of sheet metal installed. ....SMOOTH LOOKING....  #46 A look at the whole bottom. Notice the tub area...front, and back has been finished off. Tubs now make a smooth transition into trunk floor. ADDED BENEFIT..REDUCES DRAG! 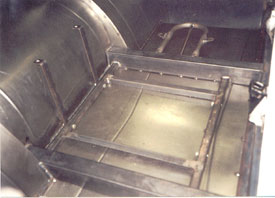 #47 Time for fuel cell mounts and battery mounts.  #48 A look up front. BACK HALF YOUR CAR: OUTER WHEEL OPENINGS WHEN OUTER TIRE CLEARANCE IS NEEDED FOR THOSE BIG TIRES THE FOLLOWING PROCEDURES ARE WHAT WE USE TO CORRECT THE PROBLEM. #1 On the quarter panel draw out the cutting areas to be removed. Try to keep the lines straight. It's easier to put back that way.    #2 We use masking tape as a guide to stay on the line while cutting. #3 This is what it looks like when the fender pieces are removed. NOTE: One of the backer strips is already installed. This is typical for this procedure.  #4 Install the tires; you'll need them for a guide. Hold up the pieces of fender that were removed and locate where they clear tires and where they also look best. NOTE: ON RACE CARS, THE SLICK WILL GROW IN DIAMETER. YOU'LL NEED AT LEAST 2" OF CLEARANCE AT THE LEADING EDGE OF FENDER TO THE TIRE.  #5 Clamp both pieces into place so you'll know exactly where to trim the quarter panel to reinstall the pieces you removed. Mark and cut.  #6 Closeup of backer strip, this is typical. Use a backer strip whenever putting fender pieces back on. To simplify, on the vertical pieces, you can use the leftover pieces that were already removed; you'll need a strip about 3/4" wide. For the horizontal strip, cut a piece of 18-20 gauge sheet metal 3/4" wide. To install strip, put just enough tack welds on them to hold them in place as shown.  #7 Once backer strips are installed and the front and back of the fender pieces are installed, you'll have to make a filler piece cut out of 20-22 gauge sheet metal. Form to the same contour as the fender so it's a perfect match when installed (as shown). Sometimes you can use a piece of 1"x1" angle iron and clamp it to the outer edge of the fender opening to get a good alignment. Now tack weld the filler piece into place.  #8 After fender is completely tack welded, it's now time for finish welding. To weld completely without warpage you have to progressively use the tack weld method until the whole area is filled with weld. WARNING! Skip around when welding to prevent warpage. Take your time! If you can't lay your hand on the panel at anytime, it's too hot. If it's too hot, walk away from it! After welding is done, grind off the high spots. If done properly it will take very little body filler on the panel before painting. Use this procedure for the best looking fender opening when done. 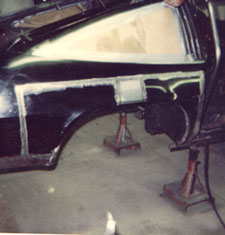  #9 a&b Here are some other examples of modifying fender openings. 9a is the split procedure as used in the previous text. 9b, This procedure is used when fender opening is almost big enough to accept the tires you are going to use. In this procedure, very slight pie cut sections are removed in front and rear of opening. Then the original lip is pushed back into place and welded, being careful to keep the resultant opening looking as stock as possible when completed as shown. IN CONCLUSION: We have now shown you how to install one of our kits, and if you follow the procedures described and illustrated, you should end up with a very profesional, functioning and looking ride. *** For more information for stretching the fender opening... check out our "Fairlane Project" (CLICK HERE) *** RULES; 1. CHECK ALL MEASUREMENTS AT LEAST TWICE BEFORE CUTTING OR WELDING. 2. USE TEMPLATE PAPER OR CARDBOARD FOR PATTERNS. IT'S CHEAPER THAN METAL! 3. TAKE YOUR TIME!!!  |